介紹如何在 PowerPoint 中加入文氏圖(Venn Diagram),呈現集合之間的交互關係。
插入文氏圖(Venn Diagram)
在 PowerPoint 中本身就有內建文氏圖的功能,以下是在簡報中加入文氏圖的步驟。
Step 1
在「插入」頁籤中,選擇「SmartArt」。
![在「插入」頁籤中選擇「SmartArt」 在「插入」頁籤中選擇「SmartArt」](https://officeguide.cc/wp-content/uploads/2021/08/powerpoint-create-venn-diagram-tutorial-examples-20210804-01.png)
Step 2
選擇「關聯圖」類型,然後選擇適合的文氏圖樣式。
![選擇文氏圖 選擇文氏圖](https://officeguide.cc/wp-content/uploads/2021/08/powerpoint-create-venn-diagram-tutorial-examples-20210804-02.png)
加入基本的文氏圖之後,可以點選文氏圖,圖形的「設計」頁籤中,選擇色彩與樣式,調整顏色。
![調整文氏圖顏色與樣式 調整文氏圖顏色與樣式](https://officeguide.cc/wp-content/uploads/2021/08/powerpoint-create-venn-diagram-tutorial-examples-20210804-03.png)
Step 4
在「變更色彩」選單中,有不同的顏色組合方式可以選擇。
![調整文氏圖顏色 調整文氏圖顏色](https://officeguide.cc/wp-content/uploads/2021/08/powerpoint-create-venn-diagram-tutorial-examples-20210804-04.png)
Step 5
文氏圖的樣式也可以調整。
![調整文氏圖樣式 調整文氏圖樣式](https://officeguide.cc/wp-content/uploads/2021/08/powerpoint-create-venn-diagram-tutorial-examples-20210804-05.png)
Step 6
另外在投影片的「設計」頁籤中,也可以變更整體簡報的配色,在變更簡報配色之後,文氏圖的配色也會跟著改變。
![選擇簡報配色 選擇簡報配色](https://officeguide.cc/wp-content/uploads/2021/08/powerpoint-create-venn-diagram-tutorial-examples-20210804-06.png)
Step 7
調整好文氏圖配色之後,接著就可以輸入文字,並調整字體大小與字型。
![輸入文字、調整字體大小與字型 輸入文字、調整字體大小與字型](https://officeguide.cc/wp-content/uploads/2021/08/powerpoint-create-venn-diagram-tutorial-examples-20210804-07.png)
加入交集標示
如果要在文氏圖中加入各個集合交集的標示,可以使用「弧線」搭配文字來處理,以下是操作步驟。
Step 1
接著如果要標示個集合之間的交集,可以先插入「弧線」。
![插入「弧線」 插入「弧線」](https://officeguide.cc/wp-content/uploads/2021/08/powerpoint-create-venn-diagram-tutorial-examples-20210804-08.png)
Step 2
調整弧線的長度、角度,放在集合交集處。
![調整弧線的長度、角度 調整弧線的長度、角度](https://officeguide.cc/wp-content/uploads/2021/08/powerpoint-create-venn-diagram-tutorial-examples-20210804-09.png)
Step 3
選擇弧線之後,在「格式」頁籤中透過圖案樣式的各種選項,調整弧線的顏色、粗細與端點樣式。
Step 4
放置好弧線之後,再加入文字,就完成基本的文氏圖了。
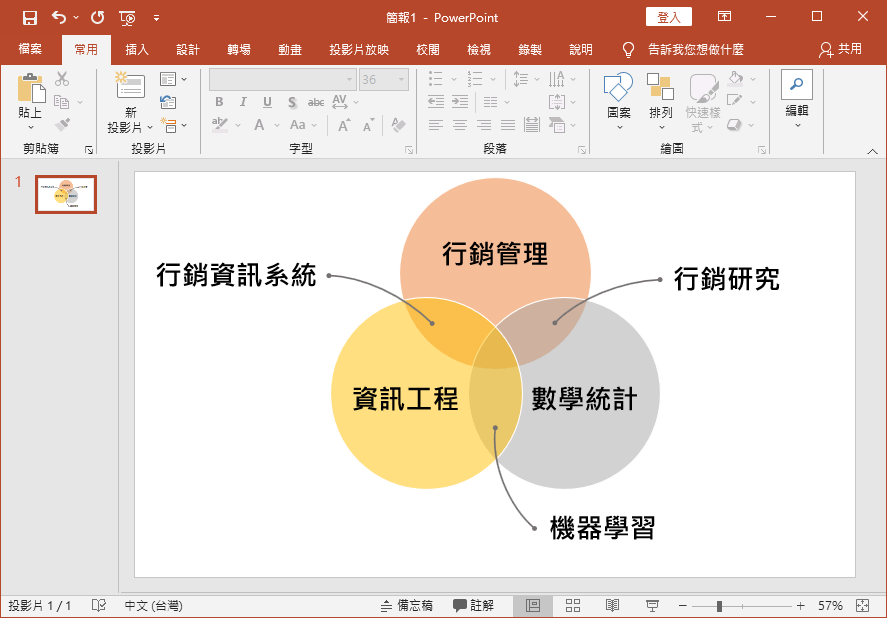
中央交集標示
在三個集合的文氏圖中,會有一個中央的交集處,通常可以使用一個圓圈來呈現。
Step 1
在「插入」頁籤中,插入一個「橢圓」。
![插入「橢圓」 插入「橢圓」](https://officeguide.cc/wp-content/uploads/2021/08/powerpoint-create-venn-diagram-tutorial-examples-20210804-12.png)
Step 2
在加入時按住 Shift 鍵以滑鼠拖曳,加入一個正圓形,並打上文字。
![加入正圓形,打上文字 加入正圓形,打上文字](https://officeguide.cc/wp-content/uploads/2021/08/powerpoint-create-venn-diagram-tutorial-examples-20210804-13.png)
套用佈景主題
在完成文氏圖之後,可以再套用簡報的佈景主題,讓整體畫面更加有質感。
Step 1
選擇簡報的「設計」頁籤,套用佈景主題。
![套用佈景主題 套用佈景主題](https://officeguide.cc/wp-content/uploads/2021/08/powerpoint-create-venn-diagram-tutorial-examples-20210804-14.png)
Step 15
套用佈景主題之後,就完成一張高品質的文氏圖了。
![套用佈景主題 套用佈景主題](https://officeguide.cc/wp-content/uploads/2021/08/powerpoint-create-venn-diagram-tutorial-examples-20210804-15.png)
這是另一個佈景主題的效果。
![套用佈景主題 套用佈景主題](https://officeguide.cc/wp-content/uploads/2021/08/powerpoint-create-venn-diagram-tutorial-examples-20210804-16.png)
PowerPoint 中內建的文氏圖雖然看起來很陽春,但是可以調整的選項相當豐富,我們也可以將其中一個集合刪掉,只留下兩個集合,並調整集合圓圈的大小與位置,並加入圖示,就可以呈現出不一樣的效果。
![自訂文氏圖 自訂文氏圖](https://officeguide.cc/wp-content/uploads/2021/08/powerpoint-create-venn-diagram-tutorial-examples-20210804-17.png)
免費文氏圖(Venn Diagram)模板下載
如果不想自己畫圖文氏圖,可以上網搜尋「PowerPoint Venn Diagram」關鍵字,尋找免費的文氏圖 PowerPoint 模板來使用,以下網站就有一些不錯的文氏圖 PowerPoint 模板:
網路上的免費板模在配色與版面上都已經調整好了,使用上非常方便。
![免費文氏圖 PowerPoint 模板 免費文氏圖 PowerPoint 模板](https://officeguide.cc/wp-content/uploads/2021/08/powerpoint-create-venn-diagram-tutorial-examples-20210803-01-1024x670.png)
參考資料
Slide Cow:Here’s How To Make a Stunning Venn Diagram in PowerPoint