介紹如何使用 Python 的各種影像相關模組,進行 DICOM 影像分析的預處理(pre-processing)。
若要讀取 DICOM 檔案,可以使用 Pydicom 模組的 dcmread 函數,這裡我們使用 Pydicom 附帶的測試 DICOM 檔案作為示範。
from pydicom import dcmread
from pydicom.data import get_testdata_files

# 取得 Pydicom 附帶的 DICOM 測試影像路徑
filename = get_testdata_files('MR_small.dcm')[0]

# 讀取 DICOM 檔案
ds = dcmread(filename)
讀取 DICOM 檔案之後,通常會先檢查 DICOM 後設資料(metadata)中關於影像的部分,最重要的就是影像的大小:
# 影像大小(DICOM 後設資料)
print("Image Size: {} x {}".format(ds.Rows, ds.Columns))
Image Size: 64 x 64
除了影像的大小之外,還需要檢查 pixel spacing:
# Pixel Spacing(DICOM 後設資料)
print("Pixel Spacing: {}".format(ds.PixelSpacing))
Pixel Spacing: [0.3125, 0.3125]
如果是 3D 的影像,則還要考慮 Spacing between Slices (0018,0088) 或 Slice Thickness (0018,0050) 或 Slice Location (0020,1041) 的差異值,根據這些值判斷 z 軸的 spacing:
# Slice Thickness(DICOM 後設資料)
print("Slice Thickness: {}".format(ds.SliceThickness))
Slice Thickness: 0.8000
通常影像的像素值範圍也是要檢查的重要數值:
# 像素值範圍(DICOM 後設資料)
print("Pixel Value: {} ~ {}".format(ds.SmallestImagePixelValue, ds.LargestImagePixelValue))
Pixel Value: 0 ~ 4000
除了從 DICOM 原始的後設資料取得資訊之外,亦可透過 Pydicom 解析後的 pixel_array 來判斷影像資訊:
# 影像大小(Pydicom 解析後資料)
print(ds.pixel_array.shape)
(64, 64)
# 像素資料類型(Pydicom 解析後資料)
print(ds.pixel_array.dtype)
int16
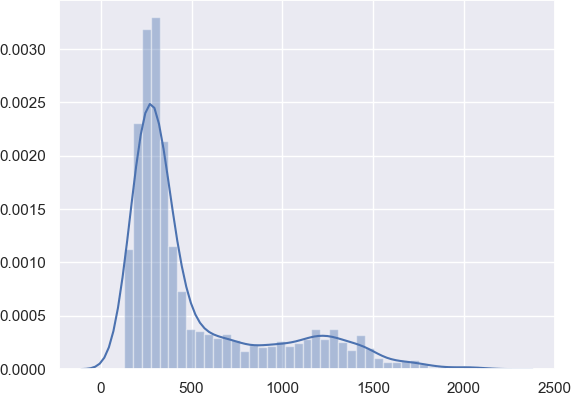
接著查看影像的像素值分佈,這部分可使用 seaborn 模組的 distplot 函數來繪製直方圖加上核密度估計(kernel density estimation)圖:
# 繪製像素值分佈圖
import matplotlib.pyplot as plt
import seaborn as sns
sns.set()
sns.distplot(ds.pixel_array.flatten())
plt.show()
在使用 seaborn 模組繪製像素值分佈圖時,如果速度太慢,可以加裝 statsmodels 模組,可讓計算速度大幅提昇。
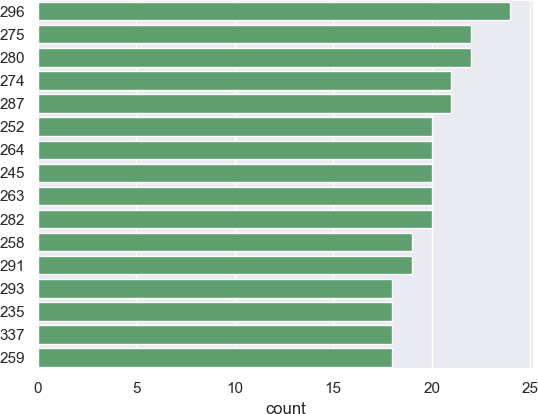
有時候我們會需要查看影像中出現頻率最高的幾個像素值:
# 出現頻率最高的 16 個像素值
import pandas as pd
top16 = pd.Series(ds.pixel_array.flatten()).value_counts().index[:16]
sns.countplot(y = ds.pixel_array.flatten(), order = top16,
              color = "g", orient = "h")
plt.show()
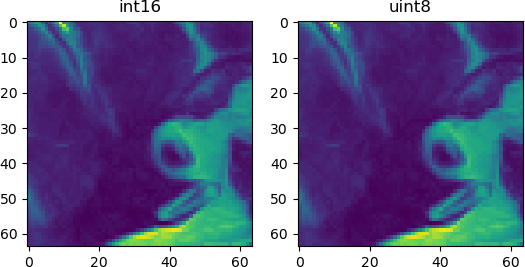
若需要將影像的像素值轉型(casting),可以直接透過 Pydicom 資料集的 pixel_array 這個 NumPy 陣列來操作,例如將影像轉型為 uint8(unsigned char):
import numpy as np

# 設定原始像素值範圍
pmax = ds.LargestImagePixelValue
pmin = ds.SmallestImagePixelValue

# 轉換為 0 ~ 255 的像素值
rescale = (ds.pixel_array - pmin) / (pmax - pmin) * 255

# 轉型為 uint8 型別
image_uint8 = rescale.astype(np.uint8)
轉換型別之後,可以用 matplotlib 將影像顯示出來,看看有無異狀:
# 以 matplotlib 繪製轉型前後影像
import matplotlib.pyplot as plt
fig = plt.figure()
fig.add_subplot(1, 2, 1).title.set_text('int16')
plt.imshow(ds.pixel_array)
fig.add_subplot(1, 2, 2).title.set_text('uint8')
plt.imshow(image_uint8)
plt.show()
若要將處理完的影像輸出至 TIFF 或 JPEG 檔案,可以使用 OpenCV 的 imwrite 函數:
import cv2

# 轉存為 TIFF 檔案
cv2.imwrite("output.tiff", image_uint8)

# 轉存為 JPEG 檔案
cv2.imwrite("output.jpeg", image_uint8)