介紹如何在 Python 中使用 SimpleITK 將兩張灰階影像合併成一張 RGB 彩色影像,評估兩張影像的對準狀況。
在做完影像對準(image registration)的處理之後,通常都會需要以視覺化的方式呈現兩張影像,評估對準的結果,以下是將兩張灰階影像合併為一張 RGB 彩色影像的流程示範。
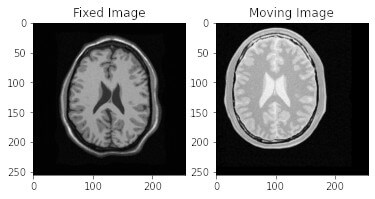
這裡我們以 Elastix 附帶的範例檔案作為示範,先將檔案載入之後,將影像做一些平移,方便觀察影像在合併之後的顏色效果:
import matplotlib.pyplot as plt
import SimpleITK as sitk

# 讀取影像
fixedImage = sitk.ReadImage("fixed.mhd")
movingImage = sitk.ReadImage("moving.mhd")

# 平移影像
translation = sitk.TranslationTransform(2)
translation.SetOffset((29, 14))
movingImage = sitk.Resample(movingImage, movingImage, translation, sitk.sitkCosineWindowedSinc, 0)

# 分開顯示兩張影像
fig, axs = plt.subplots(1, 2)
axs[0].imshow(sitk.GetArrayViewFromImage(fixedImage), cmap='gray')
axs[0].set_title('Fixed Image')
axs[1].imshow(sitk.GetArrayViewFromImage(movingImage), cmap='gray')
axs[1].set_title('Moving Image')
plt.show()
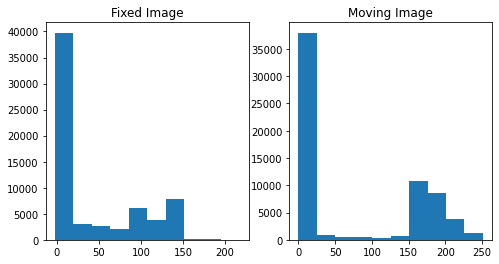
由於每張影像的亮度不同,在合併影像之前,先檢查影像像素值分布:
# 檢查影像像素值分布
fixedNDA = sitk.GetArrayViewFromImage(fixedImage)
movingNDA = sitk.GetArrayViewFromImage(movingImage)
print("Fixed Image: ({}, {})".format(fixedNDA.min(), fixedNDA.max()))
print("Moving Image: ({}, {})".format(movingNDA.min(), movingNDA.max()))
Fixed Image: (-2, 217)
Moving Image: (0, 251)
繪製像素值分布圖:
# 繪製像素值分布圖
fig, axs = plt.subplots(1, 2, figsize=(8, 4))
axs[0].hist(fixedNDA.flatten())
axs[0].set_title('Fixed Image')
axs[1].hist(movingNDA.flatten())
axs[1].set_title('Moving Image')
plt.show()
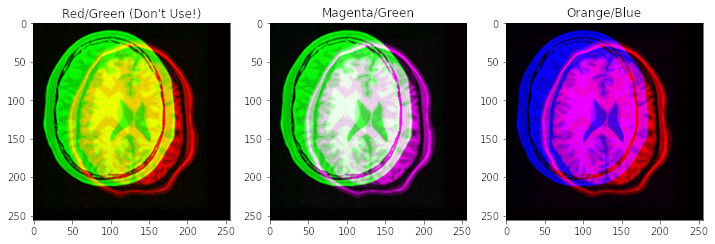
觀察兩張影像的像素值分布之後,選定要著重呈現的像素值範圍,用 IntensityWindowing 將呈現範圍取出後,再將像素值型態轉為 UInt8,最後使用各種組合方式,合併為 RGB 彩色影像:
# 將像素值型態轉為 UInt8
fixedImageUint8 = sitk.Cast(sitk.IntensityWindowing(fixedImage, windowMinimum = -2, windowMaximum = 150,
                                             outputMinimum = 0.0, outputMaximum = 255.0), sitk.sitkUInt8)
movingImageUint8 = sitk.Cast(sitk.IntensityWindowing(movingImage, windowMinimum = 0, windowMaximum = 205,
                                             outputMinimum = 0.0, outputMaximum = 255.0), sitk.sitkUInt8)

# 建立空白影像
zeros = sitk.Image(fixedImageUint8.GetSize(), fixedImageUint8.GetPixelID())
zeros.CopyInformation(fixedImageUint8)

# 各種合併影像方式
rgbImage1 = sitk.Cast(sitk.Compose(fixedImageUint8, movingImageUint8, zeros), sitk.sitkVectorUInt8)
rgbImage2 = sitk.Cast(sitk.Compose(fixedImageUint8, movingImageUint8, fixedImageUint8), sitk.sitkVectorUInt8)
rgbImage3 = sitk.Cast(sitk.Compose(fixedImageUint8, fixedImageUint8 * 0.5 + movingImageUint8 * 0.5, movingImageUint8), sitk.sitkVectorUInt8)

# 顯示 RGB 影像
fig, axs = plt.subplots(1, 3, figsize=(12, 4))
axs[0].imshow(sitk.GetArrayViewFromImage(rgbImage1))
axs[0].set_title('Red/Green (Don\'t Use!)')
axs[1].imshow(sitk.GetArrayViewFromImage(rgbImage2))
axs[1].set_title('Magenta/Green')
axs[2].imshow(sitk.GetArrayViewFromImage(rgbImage3))
axs[2].set_title('Orange/Blue')
plt.show()
根據 How to display data by color schemes compatible with red-green color perception deficiencies,單純以紅色與綠色來顯示的 RGB 圖形並不是很好的選擇(某些顏色不容易被識別),建議使用其餘兩種。
參考資料:SimpleITK Notebooks