介紹如何使用 Tsunami UDP 高速檔案傳輸協定,加速檔案的網路傳輸速度。
若在 Ubuntu Linux 中必須以自行編譯的方式來安裝 Tsunami UDP,首先要安裝一些編譯用工具套件:
# 安裝編譯用工具套件
sudo apt install gcc git automake autoconf make
下載 Tsunami-UDP 原始碼:
# 下載 Tsunami UDP 原始碼
git clone https://git.code.sf.net/p/tsunami-udp/code_git tsunami-udp-code_git
編譯 Tsunami UDP:
# 編譯 Tsunami UDP
cd tsunami-udp-code_git/tsunami-udp/
./recompile.sh
安裝 Tsunami UDP:
# 安裝 Tsunami UDP
sudo make install
若要自行指定 Tsunami UDP 的安裝目錄,則可自己更改 configure 的參數:
# 指定安裝目錄
./configure --prefix=/opt/tsunami-udp

# 安裝 Tsunami UDP
make install
若是更改過預設的安裝目錄之後,要記得設定 PATH:
# 設定 PATH
export PATH=$PATH:/opt/tsunami-udp/bin
以 Tsunami UDP 傳輸檔案時,需要在伺服器端與使用者端都安裝好 Tsunami UDP,然後先在伺服器端進入資料目錄,並啟動 Tsunami 伺服器:
# 進入資料目錄(伺服器端)
cd data/

# 啟動 Tsunami 伺服器(伺服器端)
tsunamid *
The specified 2 files will be listed on GET *:
   1)   CentOS-8.1.1911-x86_64-boot.iso  625999872 bytes
   2)   CentOS-8.1.1911-x86_64-dvd1.iso  7554990080 bytes
total characters 64
Block size: 1024
Buffer size: 20000000
Port: 46224
Tsunami Server for protocol rev 20061025
Revision: v1.1 devel cvsbuild 43
Compiled: Apr  1 2020 10:06:40
Waiting for clients to connect.
在使用者端執行 Tsunami UDP client 程式:
# 執行 Tsunami client(使用者端)
tsunami
Tsunami Client for protocol rev 20061025
Revision: v1.1 devel cvsbuild 43
Compiled: Apr  1 2020 09:09:12
tsunami>
進入 Tsunami client 之後,執行以下指令,連線至 Tsunami UDP 伺服器下載檔案:
connect 192.168.12.34
get CentOS-8.1.1911-x86_64-dvd1.iso
             last_interval                   transfer_total                   buffers      transfer_remaining  OS UDP
time          blk    data       rate rexmit     blk    data       rate rexmit queue  ring     blk   rt_len      err
00:02:10.226 23850  20.77M  531.4Mbps   3.8% 9232550    8.8G  553.9Mbps   0.0%   932  4096   87686      932   274629 RF
00:02:11.522 16850   5.62M  101.6Mbps  10.8% 9249400    8.8G  549.4Mbps   0.0%     0  3584   87646     2048   276644 R-
00:02:11.872 19850   0.00M  442.6Mbps   9.4% 9269250    8.8G  549.1Mbps   0.0%     0  4038   86397     2048   283912 R-
00:02:12.223 16550   0.00M  368.9Mbps   8.2% 9285800    8.9G  548.7Mbps   0.0%  1473  4096   85240     1473   285145 RF
00:02:12.580 16850  32.26M  369.1Mbps   7.0% 9302650    8.9G  548.2Mbps   0.0%  1259  4088   84231     1259   289442 R-
00:02:12.995 12650  23.16M  238.8Mbps  13.9% 9315300    8.9G  547.2Mbps   0.0%     0     0   75447     2048   294545 R-
00:02:13.346 21600   0.00M  481.7Mbps   0.0% 9336900    8.9G  547.0Mbps   0.0%     1     0   72576        1   295572 R-
00:02:13.697 28300   0.02M  630.6Mbps   0.0% 9365200    8.9G  547.2Mbps   0.0%     7     0   53637        7   295618 R-
00:02:14.048 28950   0.16M  644.9Mbps   0.8% 9394150    9.0G  547.5Mbps   0.0%   246     0   29843      246   295864 --
00:02:14.399 28450   5.48M  634.2Mbps   2.1% 9422600    9.0G  547.7Mbps   0.0%   610     0    1433      610   296608 --
Transfer complete. Flushing to disk and signaling server to stop...
!!!!
PC performance figure : 296608 packets dropped (if high this indicates receiving PC overload)
Transfer duration     : 134.42 seconds
Total packet data     : 73625.27 Mbit
Goodput data          : 73095.55 Mbit
File data             : 57640.00 Mbit
Throughput            : 547.73 Mbps
Goodput w/ restarts   : 543.79 Mbps
Final file rate       : 428.81 Mbps
Transfer mode         : lossless
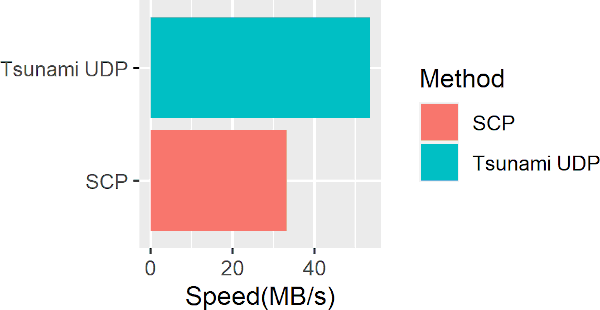
經過實際測試,傳輸一個大約 7GB 的檔案,若以傳統的 scp 來傳輸,需要的時間是 3 分 36 秒,速度大約是 33.2MB/s,而若改用 Tsunami UDP 傳輸的話,需要的時間則是 2 分 14 秒,速度大約是 53.6MB/s。
如果要將 Tsunami UDP 用於指令稿中下載檔案,可在執行 tsunami 指令時直接帶入所有要執行的動作指令:
tsunami connect 192.168.12.34 get CentOS-8.1.1911-x86_64-dvd1.iso
關於 Tsunami-UDP 更詳細的用法,可以參考 Tsunami UDP 網站上的說明。