介紹如何在 Windows 的 PowerShell 中,使用 cmdlet 建立程式碼簽章用的自簽憑證,並對程式進行簽屬。
若要產生自簽憑證,可以使用 PowerShell 中的 New-SelfSignedCertificate 這個 cmdlet:
# 建立自簽憑證
New-SelfSignedCertificate -Type Custom `
  -Subject "CN=My Software, O=My Corporation, C=TW" `
  -KeyUsage DigitalSignature `
  -FriendlyName "MyCertificate" `
  -CertStoreLocation "Cert:\CurrentUser\My" `
  -TextExtension @("2.5.29.37={text}1.3.6.1.5.5.7.3.3", "2.5.29.19={text}")
   PSParentPath: Microsoft.PowerShell.Security\Certificate::CurrentUser\My

Thumbprint                                Subject
----------                                -------
86B1DE90CCFE6640DD3C952CD965939C1E68F1D5  CN=My Software, O=My Corporation, C=TW
產生出來的憑證會存放在本機的憑證存放區 Cert:\CurrentUser\My 之下,我們可以利用以下指令顯示該憑證的詳細資訊:
# 顯示憑證詳細資訊
Get-ChildItem Cert:\CurrentUser\My\86B1DE90CCFE6640DD3C952CD965939C1E68F1D5 |
  Format-List -Property *
PSPath                   : Microsoft.PowerShell.Security\Certificate::CurrentUser\My\86B1DE90CCFE6640DD3C952CD965939C1E68F1D5
PSParentPath             : Microsoft.PowerShell.Security\Certificate::CurrentUser\My
PSChildName              : 86B1DE90CCFE6640DD3C952CD965939C1E68F1D5
PSDrive                  : Cert
PSProvider               : Microsoft.PowerShell.Security\Certificate
PSIsContainer            : False
EnhancedKeyUsageList     : {程式碼簽署 (1.3.6.1.5.5.7.3.3)}
DnsNameList              : {My Software}
SendAsTrustedIssuer      : False
EnrollmentPolicyEndPoint : Microsoft.CertificateServices.Commands.EnrollmentEndPointProperty
EnrollmentServerEndPoint : Microsoft.CertificateServices.Commands.EnrollmentEndPointProperty
PolicyId                 :
Archived                 : False
Extensions               : {System.Security.Cryptography.Oid, System.Security.Cryptography.Oid, System.Security.Cryptography.Oid, System.Security.Cryptography.Oid}
FriendlyName             : MyCertificate
IssuerName               : System.Security.Cryptography.X509Certificates.X500DistinguishedName
NotAfter                 : 2022/11/9 上午 10:22:46
NotBefore                : 2021/11/9 上午 10:02:46
HasPrivateKey            : True
PrivateKey               :
PublicKey                : System.Security.Cryptography.X509Certificates.PublicKey
RawData                  : {48, 130, 3, 86...}
SerialNumber             : 48307AE28F623DB54201D579D8CDED72
SubjectName              : System.Security.Cryptography.X509Certificates.X500DistinguishedName
SignatureAlgorithm       : System.Security.Cryptography.Oid
Thumbprint               : 86B1DE90CCFE6640DD3C952CD965939C1E68F1D5
Version                  : 3
Handle                   : 2201999688256
Issuer                   : CN=My Software, O=My Corporation, C=TW
Subject                  : CN=My Software, O=My Corporation, C=TW
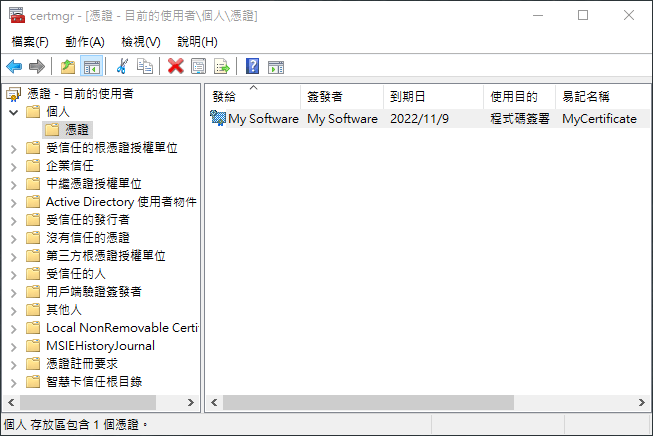
我們也可以使用控制台中的「管理使用者憑證」來查看新產生的憑證。(或是以「cert」關鍵字在 Windows 工作列中搜尋也可以找到「管理使用者憑證」)
若要將本機憑證存放區的憑證匯出至個人資訊交換(PFX)檔案,可以使用 Export-PfxCertificate 這個 cmdlet,以下是匯出憑證的步驟。
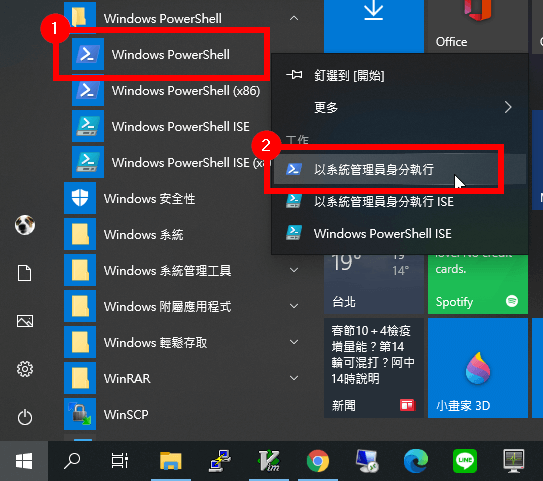
Step 1
若要匯出憑證,必須以系統管理員身分執行 PowerShell:
Step 2
首先準備好保護憑證用的密碼:
$password = ConvertTo-SecureString -String "your_password" -Force -AsPlainText
其中 your_password 請更換為自己設定的密碼。
Step 3
接著再使用 Export-PfxCertificate 將憑證匯出至 PFX 檔案:
# 將憑證匯出至 PFX 檔案
Export-PfxCertificate -Cert Cert:\CurrentUser\My\86B1DE90CCFE6640DD3C952CD965939C1E68F1D5 `
  -FilePath C:\MyCertificate.pfx -Password $password
    目錄: C:\


Mode                 LastWriteTime         Length Name
----                 -------------         ------ ----
-a----       2021/11/9  上午 11:21           2726 MyCertificate.pfx
這樣就可以將憑證匯出至 C:\MyCertificate.pfx 這個 PFX 檔案中了。
若要匯出公開的憑證檔案(不含私鑰),可以使用 Export-Certificate 這個 cmdlet:
# 將公開憑證匯出至 cer 檔案
Export-Certificate -Cert Cert:\CurrentUser\My\86B1DE90CCFE6640DD3C952CD965939C1E68F1D5 `
  -FilePath C:\MyCertificate.cer
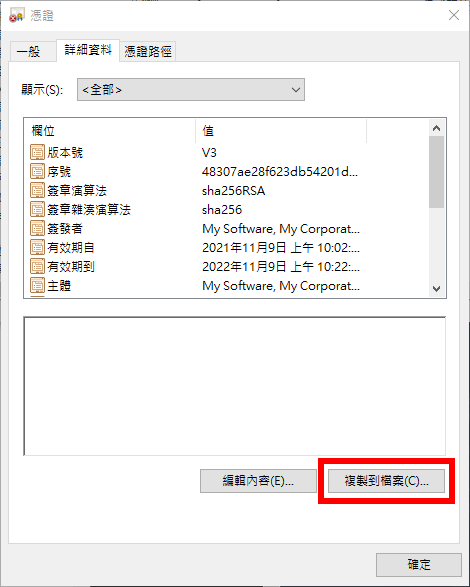
除了使用 PowerShell 指令的方式之外,我們也可以透過「管理使用者憑證」的介面來匯出 PFX 檔案。
將自簽憑證匯出成 PFX 檔案之後,就可以利用 PFX 檔案來對程式進行進行簽屬:
# 簽屬程式碼
& "C:\Program Files (x86)\Windows Kits\10\bin\10.0.22000.0\x64\signtool.exe" sign `
  /fd SHA256 `
  /f C:\MyCertificate.pfx `
  /p your_password `
  /tr http://sha256timestamp.ws.symantec.com/sha256/timestamp `
  /td SHA256 `
  /v `
  MyApp.exe
The following certificate was selected:
    Issued to: My Software
    Issued by: My Software
    Expires:   Wed Nov 09 10:22:46 2022
    SHA1 hash: 86B1DE90CCFE6640DD3C952CD965939C1E68F1D5

Done Adding Additional Store
Successfully signed: MyApp.exe

Number of files successfully Signed: 1
Number of warnings: 0
Number of errors: 0
這樣就完成程式碼的簽屬了。